[이중트리, React] 이중트리를 활용한 Component 랜더링
이를 구현해본 이유

Toss블로그 - 자료구조를 활용한 복잡한 프론트엔드 컴포넌트 제작하기
현재 작업중인 EEUM의 소개페이지 개발의 마무리단계에서 블로그를 추가적으로 개발하기위해 레퍼런스를 알아보고 있었다.
토스, 당근, 올리브영 등의 블로그를 찾아보던 도중 토스 블로그에서 작성한 게시글을 우연히 보게되었고, 충격을 받아 기능만이라도 구현해보기로했다. 프론트엔드에서 자료구조를 이렇게 적극적으로 활용해서 UI를 구현할 생각을 했다는 자체가 참 놀랍다.
구현하기
초기세팅
해당 트리를 구성하는 노드는 크게 두가지이다.
1
2
3
4
5
6
7
8
9
10
11
12
13
14
15
export interface PanelNode {
  type: "pannel";
  id: string;
}

export interface SplitNode {
  type: "split";
  id: string;
  left: LayoutNode;
  right: LayoutNode;
  orientation: "H" | "V";
  ratio: number;
}

export type LayoutNode = PanelNode | SplitNode;
- panel : 실제 랜더링 되는 컴포넌트는 해당 노드에 존재한다. 이중 트리의 leaf에 해당한다.
- split : 어떤 방향으로 (수직, 수평), 어떤 비율로 분리하는지 정보를 가지고 있다.
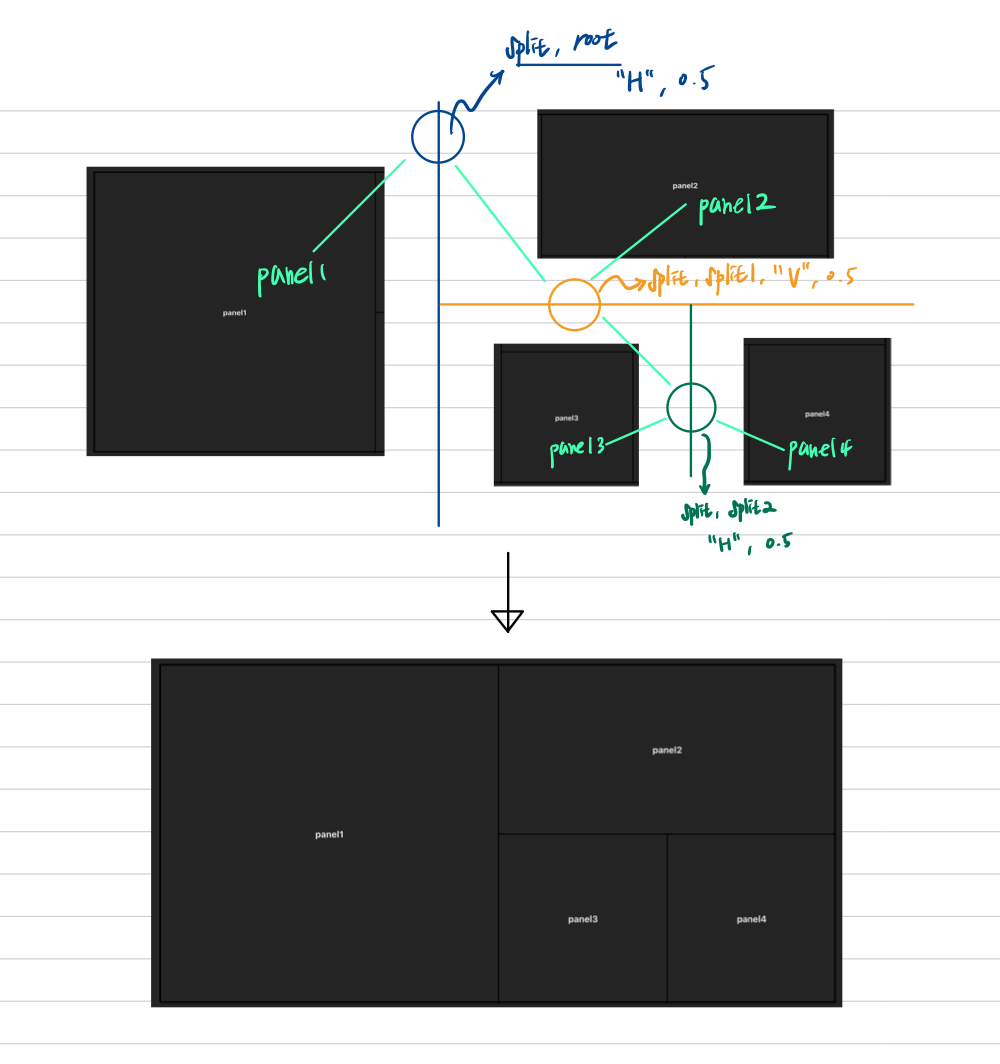
그리고 테스트를 하기 위해 다음과 같은 초기 트리를 형성했다.
1
2
3
4
5
6
7
8
9
10
11
12
13
14
15
16
17
18
19
20
21
22
23
24
25
26
27
28
29
30
31
32
33
34
const initialLayout: LayoutNode = {
  type: "split",
  id: "root",
  orientation: "H",
  ratio: 0.5,
  left: {
    type: "pannel",
    id: "panel1",
  },
  right: {
    type: "split",
    id: "split1",
    orientation: "V",
    ratio: 0.5,
    left: {
      type: "pannel",
      id: "panel2",
    },
    right: {
      type: "split",
      id: "split2",
      orientation: "H",
      ratio: 0.5,
      left: {
        type: "pannel",
        id: "panel3",
      },
      right: {
        type: "pannel",
        id: "panel4",
      },
    },
  },
};
그림으로 그리면 다음과같다.
랜더링
트리구조를 보고 랜더링하는 함수를 구현해야한다. 재귀로 동작하는 컴포넌트를 만들어 이를 구현했다.
1
2
3
4
5
6
7
8
9
10
11
12
13
14
15
16
17
18
19
20
21
22
23
24
import {LayoutNode} from "../types/nodeInterfaceAndType.ts";

export const RenderNode = ({ node, width, height, x, y }: { node: LayoutNode; width: number; height: number; x: number; y: number }) => {
  if (node.type === "pannel") {
    return (
      <div className={`absolute border border-black font-bold flex justify-center items-center`} style={{ left: x, top: y, width, height }}>
        {node.id}
      </div>
    );
  }

  const isHorizontal = node.orientation === "H";
  const leftWidth = isHorizontal ? width * node.ratio : width;
  const leftHeight = isHorizontal ? height : height * node.ratio;
  const rightWidth = isHorizontal ? width * (1 - node.ratio) : width;
  const rightHeight = isHorizontal ? height : height * (1 - node.ratio);

  return (
    <>
      <RenderNode node={node.left} width={leftWidth} height={leftHeight} x={x} y={y} />
      <RenderNode node={node.right} width={rightWidth} height={rightHeight} x={isHorizontal ? x + leftWidth : x} y={isHorizontal ? y : y + leftHeight} />
    </>
  );
};
쉽게말하면 pannel인 경우에만 div로 만들어진 컴포넌트를 반환하고, 아닌 경우엔 H, V인지 확인하여 적당한 값을 계산하고 이를 재귀적으로 연산하도록 구현했다.
컴포넌트의 이동
트리로 구성되었기에 panel의 이동이 필요할 땐, 해당 panel의 삭제, 적절한 위치에서의 panel 추가가 구현되어야한다.
탐색은 재귀적으로 진행하며 panel이면서, panelId를 가진 것과 일치한것이 나올 때 까지 탐색하도록 구현했다.
이후 찾은 값을 저장하고 있다가, 목표 타겟의 적정 위치에 삽입하도록 구현했다.
1
2
3
4
5
6
7
8
9
10
11
12
13
14
15
16
17
18
19
20
21
22
23
24
25
26
27
28
29
30
31
32
33
34
35
36
37
38
39
40
41
42
  const movePanel = (panelId: string, targetPanelId: string, direction: "left" | "right" | "top" | "bottom") => {
  let movingPanel: PanelNode | null = null;

  // 패널을 트리에서 제거하는 함수
  const removePanel = (node: LayoutNode): LayoutNode | null => {
    if (node.type === "pannel" && node.id === panelId) {
      movingPanel = node;
      return null;
    }
    if (node.type === "split") {
      const left = removePanel(node.left);
      const right = removePanel(node.right);
      if (!left) return right;
      if (!right) return left;
      return { ...node, left, right };
    }
    return node;
  };

  // 패널을 특정 위치에 추가하는 함수
  const addPanel = (node: LayoutNode): LayoutNode => {
    if (node.type === "pannel" && node.id === targetPanelId && movingPanel) {
      return {
        type: "split",
        id: `split-${panelId}-${targetPanelId}`,
        orientation: direction === "left" || direction === "right" ? "H" : "V",
        ratio: 0.5,
        left: direction === "left" || direction === "top" ? movingPanel : node,
        right: direction === "left" || direction === "top" ? node : movingPanel,
      };
    }
    if (node.type === "split") {
      return { ...node, left: addPanel(node.left), right: addPanel(node.right) };
    }
    return node;
  };

  const newLayout = removePanel(layout);
  if (movingPanel && newLayout) {
    setLayout(addPanel(newLayout) as SplitNode);
  }
};
컴포넌트의 삭제 & 추가
새로운 컴포넌트가 들어온다면? 일단 제일 우측 하단에 배치되도록 이를 구현했다.
제일 우측 하단에 있는 컴포넌트 => 수평방향, 0.5비율로 쪼개져서 들어갈 수 있도록 하였다.
1
2
3
4
5
6
7
8
9
10
11
12
13
14
15
16
17
18
19
20
21
22
23
24
// 패널 추가 (우측 하단에 배치)
const addPanel = () => {
  setPanelCount((prev) => prev + 1);
  const newPanel: PanelNode = { type: "pannel", id: `panel${panelCount + 1}` };

  const addToBottomRight = (node: LayoutNode): LayoutNode => {
    if (node.type === "pannel") {
      return {
        type: "split",
        id: `split-${node.id}-${newPanel.id}`,
        orientation: "H",
        ratio: 0.5,
        left: node,
        right: newPanel,
      };
    }
    if (node.type === "split") {
      return { ...node, right: addToBottomRight(node.right) };
    }
    return node;
  };

  setLayout((prev) => addToBottomRight(prev) as SplitNode);
};
삭제의 경우엔 해당 노드를 찾고, 그것을 삭제한 이후 다시 랜더링하도록 하였다.
1
2
3
4
5
6
7
8
9
10
11
12
13
14
15
16
17
18
const removePanelById = (panelId: string) => {
  const remove = (node: LayoutNode): LayoutNode | null => {
    if (node.type === "pannel" && node.id === panelId) return null;
    if (node.type === "split") {
      const left = remove(node.left);
      const right = remove(node.right);
      if (!left) return right;
      if (!right) return left;
      return { ...node, left, right };
    }
    return node;
  };

  const newLayout = remove(layout);
  if (newLayout) {
    setLayout(newLayout as SplitNode);
  }
};
비율 변경
비율변경의 경우에도 단순히 split id가 일치하는 것을 찾고, 삭제하도록 구현했다.
1
2
3
4
5
6
7
8
9
10
11
12
13
14
15
16
17
const changeSplitRatio = (splitId: string, newRatio: number) => {
  const updateRatio = (node: LayoutNode): LayoutNode => {
    if (node.type === "split" && node.id === splitId) {
      return { ...node, ratio: newRatio };
    }
    if (node.type === "split") {
      node.left = updateRatio(node.left);
      node.right = updateRatio(node.right);
    }
    return node;
  };

  const newLayout = updateRatio(layout);
  if (newLayout) {
    setLayout(newLayout as SplitNode);
  }
};
결론
사실 깔끔한 코드구현은 아니다. 진짜 기능만 동작하도록 구현한 수준이다.
하지만, UI를 구현하는 과정에서 이런 관점도 가질 수 있다는 것을 생각할 수 있었다.
단순히 UI를 만들어내는 것이 프론트엔드 엔지니어가 아니고, 구조를 생각하고 다양한 지식들을 실제로 적용하며 성능을 개선함과 동시에 사용자 경험을 해치지 않는 것이 프론트엔드 개발자의 진짜 역할 아닐까.